Installing VIAME from Binaries
Installation Methods
There are several ways to install VIAME depending on your platform and use case.
.zip files (Windows) or .tar.gz files (Linux) – Desktop or RDP/VNC
Installers provided are provided in compressed .zip or .tar.gz format for full desktop installations. Using these types of installers are documented in the following sections. This format of installer is also useful for when users do not have admin privileges on their machines.
.exe / .msi (Windows Only) – Desktop or RDP/VNC
Desktop installers are also provided via Windows installation wizards. This allows users to select which components they want on, with known defaults.
.dmg / .app (Mac Only) – Desktop
A reduced version of the software with just certain annotators (DIVE). Most Macs stopped shipping with NVIDIA cards a few years back, making training pipelines difficult.
Algorithm Docker Containers – Desktop or Web
Algorithm-only docker containers with examples, project file, and command-line interface support are provided on Docker Hub. See the GitHub page for more examples and links. This allows users to install the algorithms on local, remote or 3rd-party (e.g. AWS, Azure) servers easier for deployments, e.g. if one wants to just train up models as opposed to hosting a full web GUI interface.
Web-App Docker Containers – Web / Web Browser App
Installers for the full web application are available for hosting instances of the data manager graphical interface (which is accessed via web browser) plus annotation pipelines on local or remote servers. See the GitHub page for more information. An example of this is hosted at https://viame.kitware.com. In this case users don’t need GPUs, rather just one central server does.
Desktop Installation from ZIP/TAR Files
Windows 7/8/10/11, 64-Bit
Requirements:
Windows 7, 8, 10, or 11, 64-Bit
Recommendations:
NVIDIA GPU with >= 4 Gb Video RAM (partial image processing support)
NVIDIA GPU with >= 8 Gb Video RAM (full image processing support)
Linux (Ubuntu, CentOS, RHEL, etc.)
Requirements:
Ubuntu (e.g. 16.04, 18.04), CentOS 7/8, and many others
Recommendations:
NVIDIA GPU with >= 4 Gb Video RAM (partial image processing support)
NVIDIA GPU with >= 8 Gb Video RAM (full image processing support)
Step A. Download Binaries
Go to: https://github.com/VIAME/VIAME
Download the correct pre-built binary for your operating system. Binaries are currently large (~4Gb) due to the inclusion of multiple model files for training different methods.
Step B. Uninstall Previous Versions
Only perform this step if you have a previously installed version.
Windows: Typically located at C:\Program Files\VIAME. Remove this directory,
optionally backing it up until you validate your new installation.
Linux: Typically located at /opt/noaa/viame. Remove this directory, optionally
backing it up until you validate your new installation. To optionally backup, open terminal:
cd /opt/noaa
mv viame viame-bckup
After validating the new installation, remove old version:
rm -rf /opt/noaa/viame-bckup
Step C. Install Dependency – NVIDIA Drivers
Only perform this step if you don’t have CUDA or appropriate NVIDIA drivers installed ahead of time and are using GPU-enabled binaries.
Windows:
Drivers can be found at: https://www.nvidia.com/Download/index.aspx?lang=en-us
Version 570.65 or above is required for installation.
Or alternatively get CUDA (installing CUDA is no longer required, even though it used to be, only the drivers are, but they are included in CUDA providing another path to get the drivers). CUDA also has some other useful tools, such as nvidia-smi.exe, which is useful for monitoring GPU resources.
Note
Windows 7, unlike 8 and 10, requires some updates and service packs installed alongside drivers or else you will get errors using GPU-dependent code.
Linux:
Drivers can be found at:
Version 570.65 or above is required for installation.
Or alternatively get CUDA (no longer required, only the drivers are, but they are included in CUDA): https://developer.nvidia.com/cuda-toolkit-archive
The best way to install the drivers depends on your Linux version. We recommend using package managers (like the above PPA for Ubuntu) when able, but if that fails falling back to one of NVIDIA’s standalone installers.
Step D. Extract Downloaded VIAME Binaries
Choose an installation directory for VIAME.
Windows:
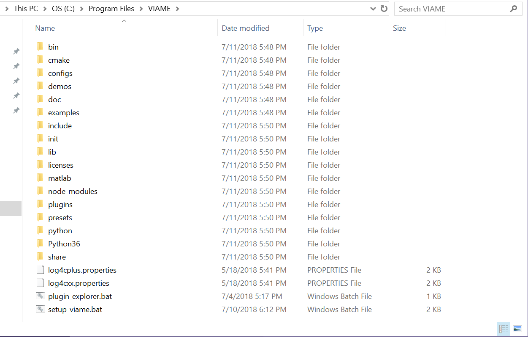
We recommend C:\Program Files\VIAME, from here on out this will be known as [viame-install].
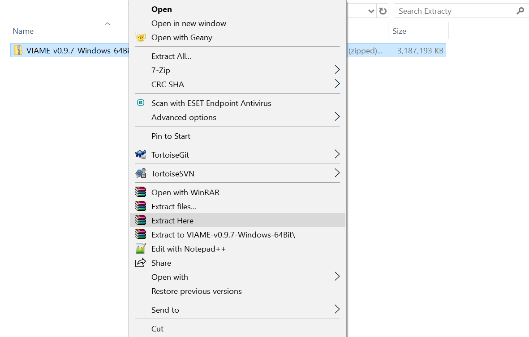
Extract the binaries from step A, for example if using WinRAR select “Extract All” or use the default Windows “Extract All” option.
The contents of the folder should look like the below.
Linux:
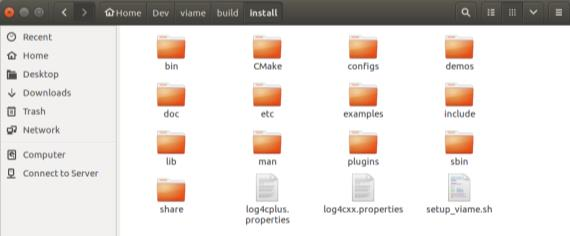
We recommend /opt/noaa/viame, from here on out this will be known as [viame-install].
Extract the binaries from step A, for example, right click on the downloaded .tar.gz binaries file and click “Extract Here”.
The alternative is to untar the file on the command line:
tar -xvf VIAME-v*-Ubuntu-64Bit.tar.gz
Navigate to the folder with the extracted ‘viame’ folder and move it to [viame-install], for example:
mkdir -p /opt/noaa/
mv viame /opt/noaa
The contents of the folder should look like the below.
Depending on your system, you may need to get permission to modify your install directory (e.g. /opt/noaa/viame).
Installation Complete
VIAME Web
For web-based installations, refer to the VIAME Web / DIVE documentation and the Docker setup instructions on the main GitHub page.