Size Measurement Examples
Running the Demo
This section corresponds to the `size measurement`_ example folder within a VIAME desktop installation. This folder contains examples covering fish measurement using stereo. This example is currently a work in progress.
Run CMake to automatically download the demo data into this example folder. Alternatively you can download the demo data directly.
Setup:
Make sure you build VIAME with VIAME_ENABLE_PYTHON=True and VIAME_ENABLE_OPENCV=True.
For simplicity this tutorial will assume that the VIAME source directory is [viame-source] and the build directory is [viame-build]. Please modify these as needeed to match your system setup. We also assume that you have built VIAME.
Additionally this example requires an extra python dependency to be installed. On Linux or Windows, ‘pip install ubelt’.
Available Scripts
This example folder contains several scripts for different measurement workflows. Each script is available in both Linux (.sh) and Windows (.bat) versions.
- calibrate_cameras
Runs the camera calibration tool to compute stereo camera calibration parameters from a video or set of images containing a chessboard calibration pattern. Outputs a JSON file (calibration_matrices.json) compatible with the VIAME measurement pipelines. Usage:
./calibrate_cameras.sh <video_file_or_image_glob>- measure_via_gmm_oriented_boxes
Runs the automatic GMM (Gaussian Mixture Model) motion-based measurement pipeline. This pipeline uses background subtraction to detect moving objects and computes oriented bounding boxes for measurement. Best suited for scenarios with stationary cameras and moving fish.
- measure_via_default_fish
Runs the default automatic fish measurement pipeline using a neural network-based fish detector. This pipeline detects fish using a trained model and performs stereo measurement on the detected objects.
- measure_over_manual_annotations
Runs measurement on user-provided annotations. Use this when you have manually annotated fish locations and want to compute measurements from those annotations rather than using automatic detection.
- gmm_standalone_tool
A standalone tool for GMM-based measurement that includes disparity computation. This script provides more control over the measurement process and can be used for debugging or custom workflows.
- compute_depth_maps
Computes stereo disparity/depth maps from the calibrated stereo camera imagery. Useful for visualizing the depth information or for custom processing workflows.
Running via the pipeline runner
To run the process using the sprokit C++ pipeline we use the the pipeline runner:
# First move to the example directory
cd [viame-build]/install/examples/size_measurement

# The below script runs pipeline runner on the GMM motion-based measurement
bash measure_via_gmm_oriented_boxes.sh
This example runs at about 4.0Hz, and takes 13.3 seconds to complete on a 2017 i7 2.8Ghz Dell laptop.
Running via installed opencv python module
The above pipeline can alternatively be run as a python script.
# move to your VIAME build directory
cd [viame-build]
# Run the setup script to setup the proper paths and environment variables
source install/setup_viame.sh

# you may also want to set these environment variables
# export KWIVER_DEFAULT_LOG_LEVEL=debug
export KWIVER_DEFAULT_LOG_LEVEL=info
export SPROKIT_PYTHON_MODULES=kwiver.processes:viame.processes
You should be able to run the help command
python -m viame.opencv.stereo_demo --help
The script can be run on the demodata via
python -m viame.opencv.stereo_demo \
    --left=camtrawl_demodata/left --right=camtrawl_demodata/right \
    --cal=camtrawl_demodata/cal.npz \
    --out=out --draw -f
Running via the standalone script
Alternatively you can run by specifying the path to opencv module (if you have a python environment you should be able to run this without even building VIAME)
# First move to the example directory
cd [viame-source]/examples/size_measurement

# Run the stereo_demo module directly via the path
python ../../plugins/opencv/stereo_demo.py \
    --left=camtrawl_demodata/left --right=camtrawl_demodata/right \
    --cal=camtrawl_demodata/cal.npz \
    --out=out --draw -f
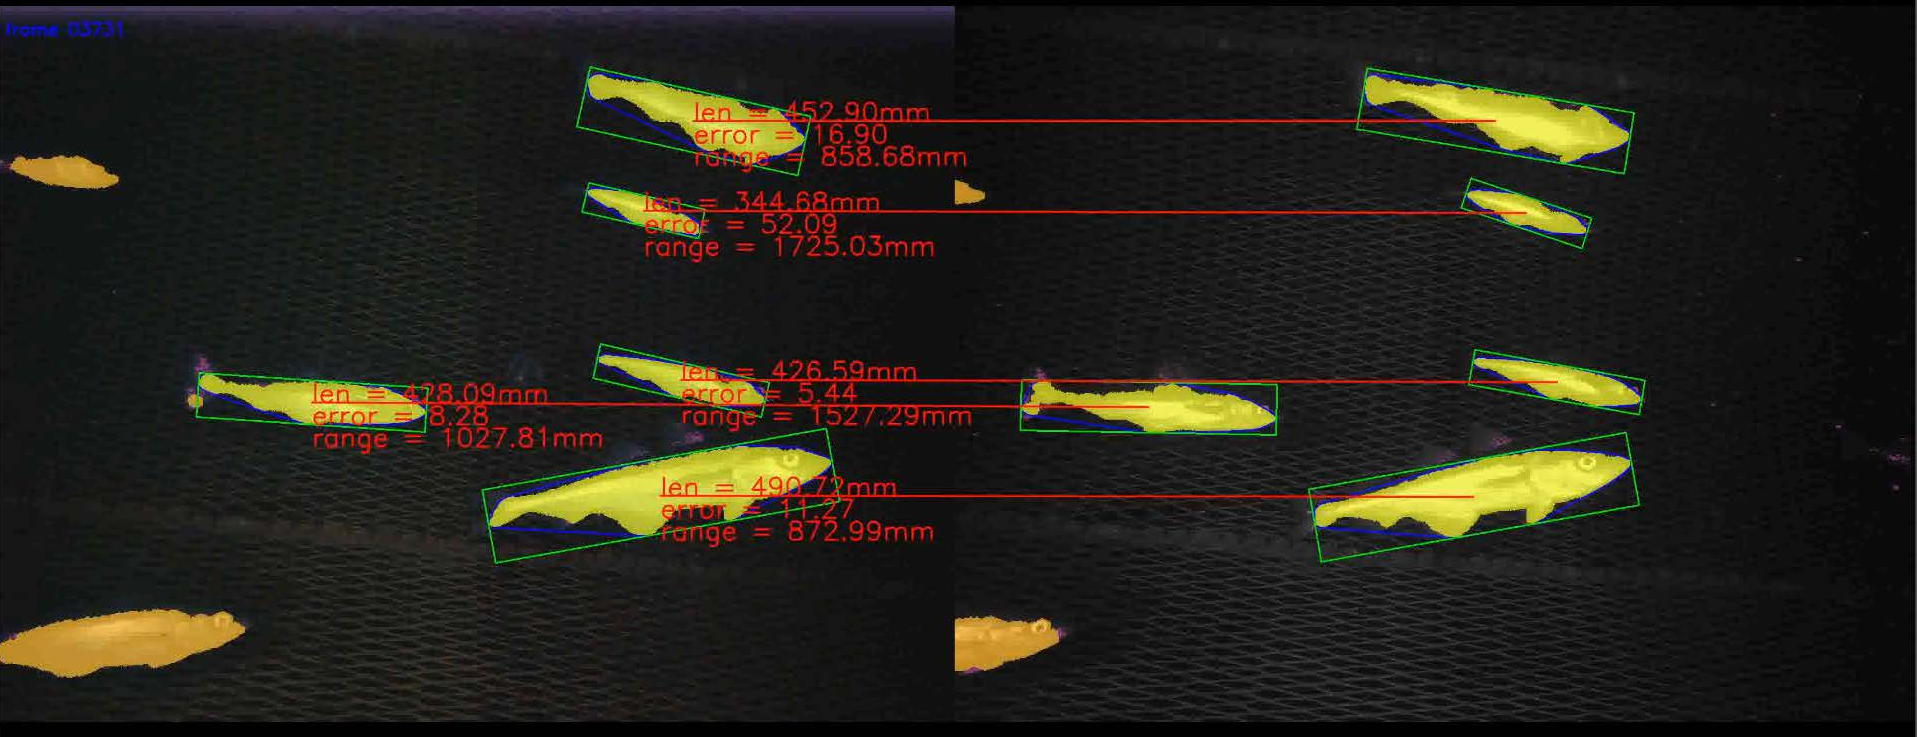
Without the –draw flag the above example, this example runs at about 2.5Hz, and takes 20 seconds to complete on a 2017 i7 2.8Ghz Dell laptop.
With –draw it takes significantly longer (it runs at 0.81 Hz and takes over a minute to complete), but will output images like the one at the top of this readme as well as a CSV file.
Note that the KWIVER C++ Sprokit pipline offers a significant speedup (4Hz vs 2.5Hz), although it currently does not have the ability to output the algorithm visualization.
Calibration File Format
For the npz file format the root object should be a python dict with the following keys and values:
For the mat file, format the root structure should be a dict with the key Cal whose value is a dict with the following items: