Installing from Pre-Built Binaries
First, download the binaries for your operating system from the main github page:
https://github.com/VIAME/VIAME
Next, use the offline quick start guide located at the below link to complete the installation:
Building VIAME From Source
See the platform-specific guides below, though the process is similar for each. This document corresponds to the example located online here and also to the building_and_installing_viame example folder in a VIAME installation.
Building on Linux
These instructions are designed to help build VIAME on a fresh machine. They were written for and tested on Ubuntu 16.04. Other Linux machines will have similar directions, but some steps (particularly the dependency install) may not be exactly identical. VIAME has also been built on: CentOS/RHEL 6+, Fedora 19+, and Ubuntu 16.04+ at a minimum.
Install Dependencies
Different Linux distributions may have different packages already installed, or may use a different package manager than apt, but on Ubuntu this should help to provide a starting point:
sudo apt-get install git zip git wget curl libcurl4-openssl-dev libgl1-mesa-dev libexpat1-dev \
  libgtk2.0-dev libxt-dev libxml2-dev libssl-dev liblapack-dev openssl libssl-dev g++ zlib1g-dev
And on CentOS 7:
sudo yum -y groupinstall 'Development Tools'
sudo yum install -y zip git wget openssl openssl-devel zlib zlib-devel freeglut-devel \
  mesa-libGLU-devel lapack-devel libXt-devel libXmu-devel libXi-devel expat-devel readline-devel \
  curl curl-devel atlas-devel file which
If using VIAME_ENABLE_PYTHON, you also may need to install python3.6, python3.6-dev, and numpy (or alternatively whatever python distribution you want to use, we reccomend 3.5+ or installing Anaconda3), e.g.:
sudo apt-get install python3.6 python3.6-dev && sudo pip install numpy
If using VIAME_ENABLE_CUDA for GPU support, you should install CUDA (version 9.0 or above is recommended, other versions may work depending on your build settings but are untested):
https://developer.nvidia.com/cuda-toolkit-archive
Install CMAKE
Depending on the OS, the version of cmake you get with apt/yum/dnf is sometimes too old to
use for building VIAME (you currently need at least CMake 3.11.3) so you may need to do a
manual install of CMake. Go to the cmake website, https://cmake.org/download, and download
the appropriate binary distribution (for Ubuntu, this would be something like
cmake-3.11.3-Linux-x86_64.sh, though newer versions will be out by the time you read this).
Alternatively, download the source code, e.g. cmake-3.11.3.tar.gz, and build the binaries
from source. To untar and build the source, use the following set of commands. Keep in
mind that if you’re not using version 3.11.3, you’ll need to update the version number in
the below to match your downloaded version.
cd ~/Downloads
tar zxfv cmake-3.11.3.tar.gz
cd cmake-3.11.3
./bootstrap --system-curl --no-system-libs
make
sudo make install
sudo ln -s /usr/local/bin/cmake /bin/cmake
These instructions build the source code into a working executable, installs the executable into a personal system directory, and then lets the operating system know where that directory is so it can find cmake in the future in case /usr/local/bin isn’t in your PATH variable by default.
Clone the Source Code
With all our dependencies installed, we need to build the environment for VIAME
itself. VIAME uses git submodules rather than requiring the user to grab each
repository totally separately. To prepare the environment and obtain all the
necessary source code, use the following commands. Note that you can change src
o whatever you want to name your VIAME source directory.
git clone git@github.com:Kitware/VIAME.git src
cd src
git submodule update --init --recursive
Build VIAME
VIAME may be built with a number of optional plugins–VXL, Caffe, OpenCV,
Scallop_TK, and Matlab–with a corresponding option called VIAME_ENABLE_[option],
in all caps. For each plugin to install, you need a cmake build flag setting the
option. The flag looks like -DVIAME_ENABLE_OPENCV:BOOL=ON, of course changing
OPENCV to match the plugin. Multiple plugins may be used, or none. If uncertain what
to turn on, it’s best to just leave the default enable and disable flags which will
build most (though not all) functionalities. At a minimum, these are core components
we recommend leaving turned on:
Flag |
Description |
|---|---|
VIAME_ENABLE_OPENCV |
Builds OpenCV and basic OpenCV processes (video readers, simple GUIs) |
VIAME_ENABLE_VXL |
Builds VXL and basic VXL processes (video readers, image filters) |
VIAME_ENABLE_PYTHON |
Turns on support for using python processes (multiple algorithms) |
VIAME_ENABLE_PYTORCH |
Installs all pytorch processes (detectors, trackers, classifiers) |
And a number of flags which control which system utilities and optimizations are built, e.g.:
Flag |
Description |
|---|---|
VIAME_ENABLE_CUDA |
Enables CUDA (GPU) optimizations across all processes (OpenCV, Caffe, etc…) |
VIAME_ENABLE_CUDNN |
Enables CUDNN (GPU) optimizations across all processes |
VIAME_ENABLE_VIVIA |
Builds VIVIA GUIs (tools for making annotations and viewing detections) |
VIAME_ENABLE_KWANT |
Builds KWANT detection and track evaluation (scoring) tools |
VIAME_ENABLE_DOCS |
Builds Doxygen class-level documentation for projects (puts in install share tree) |
VIAME_BUILD_DEPENDENCIES |
Build VIAME as a super-build, building all dependencies (default behavior) |
VIAME_INSTALL_EXAMPLES |
Installs examples for the above modules into install/examples tree |
VIAME_DOWNLOAD_MODELS |
Downloads pre-trained models for use with the examples and training new models |
And lastly, a number of flags which build algorithms with more specialized functionality:
Flag |
Description |
|---|---|
VIAME_ENABLE_SMQTK |
Enables CUDA (GPU) optimizations across all processes (OpenCV, Caffe, etc…) |
VIAME_ENABLE_SCALLOP_TK |
Builds Scallop-TK based object detector plugin |
VIAME_ENABLE_YOLO |
Builds YOLO (Darknet) object detector plugin |
VIAME_ENABLE_BURNOUT |
Builds Burn-Out based pixel classifier plugin |
VIAME_ENABLE_ITK |
Builds ITK cross-modality image registration |
VIAME_ENABLE_UW_CLASSIFIER |
Builds UW fish classifier plugin |
VIAME_ENABLE_TENSORFLOW |
Builds TensorFlow object detector plugin |
VIAME_ENABLE_SEAL_TK |
Builds Seal Multi-Modality GUI |
VIAME_ENABLE_MATLAB |
Turns on support for and installs all matlab processes |
VIAME_ENABLE_LANL |
Builds an additional (Matlab) scallop detector |
VIAME can be built either in the source directory tree or in a seperate build directory (recommended). Replace “[build-directory]” with your location of choice, and run the following commands:
mkdir [build-directory]
cd [build-directory]
cmake [build_flags] [path_to_source_tree]
make -j8 # or just make for a unthreaded build
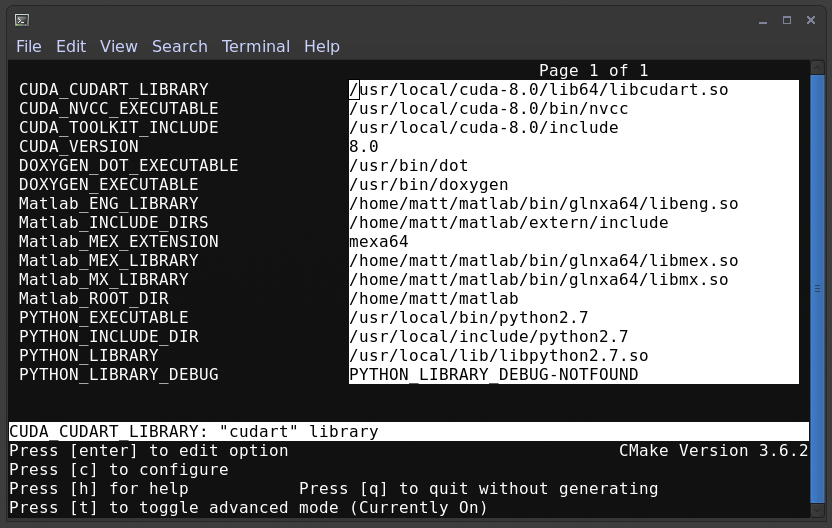
Depending on which enable flags you have set and your system configuration, you may need to set additional cmake variables to point to dependency locations. An example is below for a system with CUDA, Python, and Matlab enabled, though the versions are old. Please do not use CUDA 8 or python 2.7 anymore.
Building on Mac OSX
Building on Mac is very similar to Linux, minus the dependency install stage. Currently, we have only tested VIAME with OSX 10.11.5 and Clang 7.3.0, but other versions may also work. Make sure you have a C/C++ development environment set up, install git, install cmake either from the source or a using a binary installer, and lastly, follow the same Linux build instructions above.
Building on Windows
Building on windows can be very similar to Linux if using a shell like cygwin
(https://www.cygwin.com/), though if not you may want to go grab the GUI
ersions of CMake (https://cmake.org/) and TortoiseGit (https://tortoisegit.org/).
Currently Visual Studio 2015 and some versions of 2017 are supported.
First do a Git clone of the source code for VIAME. If you have TortoiseGit this
involves right clicking in your folder of choice, selecting Git Clone, and then
entering the URL to VIAME (https://github.com/VIAME/VIAME.git) and the location
of where you want to put the downloaded source code.
Next, do a git submodule update to pull down all required packages. In TortoiseGit
right click on the folder you checked out the source into, move to the TortoiseGit
menu section, and select Submodule Update.
Next, install any required dependencies for items you want to build. If using CUDA, version 9.0 or above is desired, along with Python 3.6+. Other versions have yet to be tested extensively, though may work. On Windows it can also be beneficial to use Anaconda to get multiple python packages. Boost Python (turned on by default when Python is enabled) requires Numpy and a few other dependencies.
Finally, create a build folder and run the CMake GUI (https://cmake.org/runningcmake/).
Point it to your source and build directories, select your compiler of choice, and
setup and build flags you want.
The biggest build issues on Windows arise from building VIAME in super-build and exceeded the windows maximum folder path length. This will typically manifest as build errors in the kwiver python libraries. To bypass these errors you have 2 options:
Build VIAME in as high level as possible (e.g. C:/VIAME) or, alternatively
Set the VIAME_KWIVER_BUILD_DIR path to be something small outside of your superbuild location, e.g. C:/tmp/kwiver to bypass path length limits. Thi is performed, for example, in the nightly build server cmake script as an example https://github.com/VIAME/VIAME/blob/master/cmake/build_server_windows.cmake
Updating VIAME
If you already have a checkout of VIAME and want to switch branches or update your code, it is important to re-run:
git submodule update --init --recursive
After switching branches to ensure that you have on the correct hashes of sub-packages within the build (e.g. fletch or KWIVER). Very rarely you may also need to run:
git submodule sync
Just in case the address of submodules has changed. You only need to run this command if you get a “cannot fetch hash #hashid” error.
Build Tips ‘n Tricks
Super-Build Optimizations:
When VIAME is built as a super-build, multiple solutions or makefiles are generated for each individual project in the super-build. These can be opened up if you want to experiment with changes in one and not rebuild the entire superbuild. VIAME places these projects in [build-directory]/build/src/* and fletch in [build-directory]/build/src/fletch-build/build/src/*. You can also run ccmake or the cmake GUI in these locations, which can let you manually change the build settings for sub-projects (say, for example, if one doesn’t build).
Python:
The default Python used is 3.6, though other versions may work as well. It depends on your build settings, operating system, and which dependency projects are turned on.
Known Build Issues
Issue:
When compiling with CUDA turned on:
nvcc fatal   : Visual Studio configuration file 'vcvars64.bat' could not be found for
installation at 'Microsoft Visual Studio XX.0/VC/bin/x86_amd64/../../..'
or similar.
Solution:
Express/Community versions of visual studio don’t ship with a file called vcvars64.bat You can add one manually be placing a bat file called ‘vcvars64.bat’ in folder ‘Microsoft Visual Studio XX.0VCbinamd64’ for your version of visual studio. This file should contain just a single line:
CALL setenv /x64
Issue:
Boost fails to build early with error in *_out.txt:
c++: internal compiler error: Killed (program cc1plus)
Solution:
You are likely running out of memory and your C++ compiler is crashing (common on VMs with a small amount of memory). Increase the amount of memory availability to your VM or buy a better computer if not running a VM with at least 1 Gb of RAM.
Issue:
On VS2015 with Python enabled: error LNK1104: cannot open file 'python27_d.lib'
Solution:
If you want to link against python in debug mode, you’ll have to build Python itself to enable debug libraries, as the default python distributions do not contain them. Alternatively switch to Release or RelWDebug modes.
Issue:
ImportError: No module named numpy.distutils
Solution:
You have python installed, but not numpy. Install numpy.
Issue:
cannot find cublas_v2.h or linking issues against CUDA
Solution:
VIAME contains a VIAME_DISABLE_GPU_SUPPORT flag due to numerous issues relating to
GPU code building. Alternatively you can debug the issue (incorrect CUDA drivers for
OpenCV, Caffe, etc…), or alternatively not having your CUDA headers set to be in your include path.
Issue:
CMake Error at CMakeLists.txt:200 (message):
  Unable to locate CUDNN library
Solution:
You have enabled CUDNN but the system is unable to locate CUDNN, as the message says.
Note CUDNN is installed seperately from CUDA, they are different things.
You need to set the VIAME flag CUDNN_LIBRARY to something like /usr/local/cuda/lib64/libcudnn.so. Alternatively you can set CUDNN_ROOT to /usr/local/cuda/lib64 manually if that’s where you installed it.
Issue:
When VIAME_ENABLE_DOC is turned on and doing a multi-threaded build, sometimes the build fails.
Solution:
Run make -jX multiple times, or don’t run make -jX when VIAME_ENABLE_DOCS is enabled.
Issue:
CMake says it cannot find MATLAB
Solution:
Make sure your matlab CMake paths are set to something like the following
Matlab_ENG_LIBRARY:FILEPATH=[matlab_install_loc]/bin/glnxa64/libeng.so
Matlab_INCLUDE_DIRS:PATH=[matlab_install_loc]/extern/include
Matlab_MEX_EXTENSION:STRING=mexa64
Matlab_MEX_LIBRARY:FILEPATH=[matlab_install_loc]/bin/glnxa64/libmex.so
Matlab_MX_LIBRARY:FILEPATH=[matlab_install_loc]/bin/glnxa64/libmx.so
Matlab_ROOT_DIR:PATH=[matlab_install_loc]
Issue:
When PYTHON is enabled, getting the below error.
[100%] Building CXX object python/CMakeFiles/pycaffe.dir/caffe/_caffe.cpp.o
_caffe.cpp:8:41: error: boost/python/raw_function.hpp: No such file or directory
_caffe.cpp: In function ‘void caffe::init_module__caffe()’:
_caffe.cpp:349: error: ‘raw_function’ is not a member of ‘bp’
_caffe.cpp:406: error: ‘raw_function’ is not a member of ‘bp’
make[2]: *** [python/CMakeFiles/pycaffe.dir/caffe/_caffe.cpp.o] Error 1
make[1]: *** [python/CMakeFiles/pycaffe.dir/all] Error 2
make: *** [all] Error 2
Solution:
raw_function.hpp doesn’t get installed for some reason on some systems. Manually copy it from:
[VIAME_BUILD]/build/src/fletch-build/build/src/Boost/boost/python/raw_function.hpp
to
[VIAME_BUILD]/install/include/boost/python/